Monday 21 March 2011

FO: Maeva Socks

Maeva

Maeva

Maeva

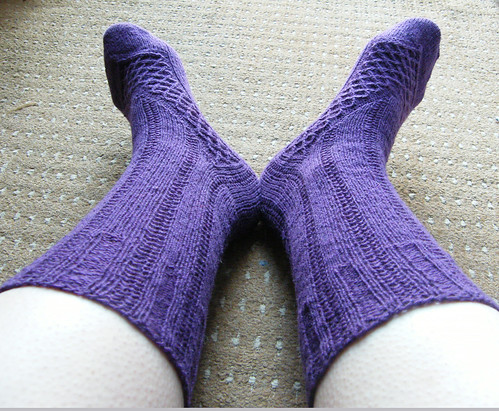
I finished these socks a little while ago. They're the Maeva socks, from knitty.com The designer is Stefanie Bold, and I just love this design of hers! It's another one of those "saw-it-when-the-new-issue-came-out-and-just-had-to-cast-it-on-RIGHT-THEN" type of project.

Maeva

Maeva

Maeva - Toe

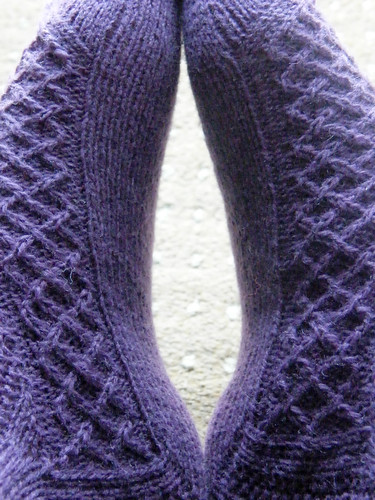
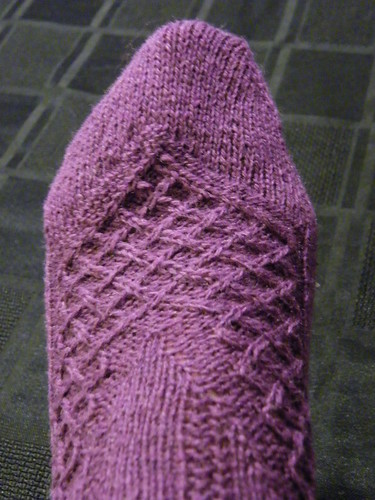
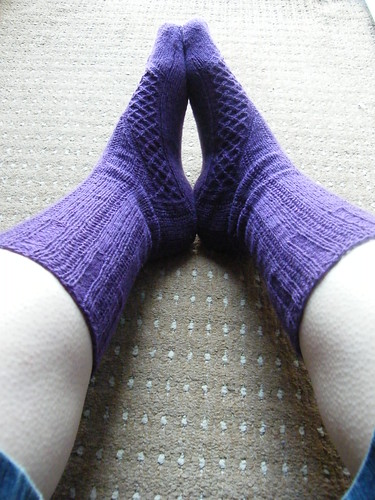
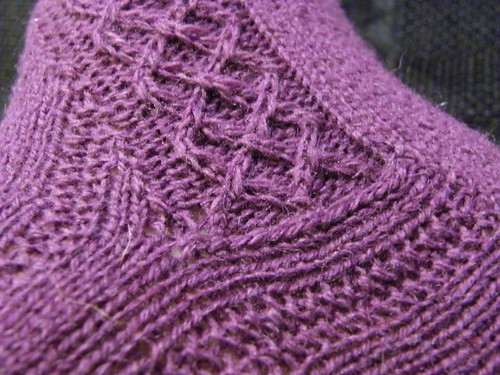
I love the tiny cables going up the side. That's what drew me to the pattern in the first place, the intricate detail Stefanie has designed into the socks. It is all charted out in the pattern, and I found the charts easy to follow for such tiny details.

Maeva

Maeva - Heel Close-Up

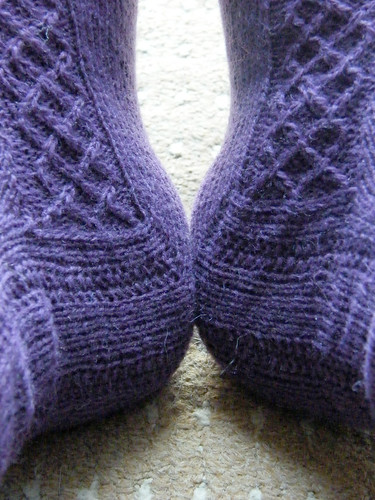
One of my favourite construction details of these socks was the heel. The sock is knitted from the toe up, which nearly put me off knitting them because I don't like short row heels, which is normally what is written into a toe-up sock pattern. But I so much wanted these socks, so I actually read ahead in the pattern (I know, GASP!) and discovered that it was actually a toe-up heel-flap kind of sock. Yay! I love how the heel joins in this kind of sock, it's like magic when you join the heel flap as you're knitting and then it all just appears into a sock heel. I love that knitting two stitches together can make such a 3-dimensional object so cleverly. And heel flaps actually stay on my heel, not like short row heel which just slide all the way off. Very annoying. So, this sock was great in that respect.

I also love how the gusset was increased in order to make the cables run along the edge of the sock, very clever! I think I'd heard something about how increases don't need to be in the traditional triangle shape, but this is the first time I'd tried anything like moving the gusset shaping, and it was such a lightbulb moment when I figured out what was happening.

By the way, the photos on the table top are more accurate for colour. I find getting the right colour to be very awkward in photography. I know everyone says to use natural light, but in this case, sunlight made the purple appear much lighter, and less plummy.

So, the specs and details of how I made these: I made the Small size (9.75" foot length). I used 2mm DPNs for the foot in order to get gauge. Gauge is very important for these socks. I used 2.25 at first and knitted all the way to the heel before I figured this out. The foot was about 2 inches too large :( so I had to start all over again, after having done a swatch to find out my gauge. It's just as well the 2mm needles worked, I don't have anything smaller! Although, thinking about it, she has provided directions for 4 different sizes. But it didn't occur to me to do math. I'd suggest trying very hard for gauge first :)

I then went up to 2.5mm needles immediately after the heel turn, and also increased from 60sts to 64sts to accommodate my ahem, insulated ankles. That's the needle size and stitch count that I normally use, and it works for my legs. It wasn't hard to fit into the rib pattern, in fact the size up uses 64sts so I could have followed the chart for that, but by that point, I had it figured out.

I love these socks! I love all the detail in the pattern, and it's so well written. To anyone scared by all the tiny cables, I'd say don't worry. If you can cable and have made socks before, just follow the pattern and you'll be OK, it's very clear and manageable, with all the parts of the foot broken down into individual charts. So, definitely a recommended pattern! Go, knit! :D

Wednesday 16 March 2011

Crochet For Sewing

With all those cushions I've been making (see my last post), I've been having lots of pins lying around the house. I've been stabbed by the tiny little ******s so many times, while actually sewing the cushions, and just from random pins lying around. My poor hands are full of holes :(

So I decided I needed somewhere to store all these pins. They had come in a tiny little box, but they were overflowing out of that box. I've no idea how the manufacturer managed to stuff them all in there! I couldn't close the thing again without it popping open and spraying pins everywhere. So I moved them all into an empty Ferrero Rocher box (much larger and also seethrough) But there were still pins lying around from when I took them out of the fabric as I was sewing. So I decided I needed a pincushion.

I had some polyester thread in 20m wraps from a sewing kit that I'd been given. I decided to make triangles from 4 colours, and to then sew them into a pyramid. This meant I'd have less thread lying around that I probably wasn't going to use in sewing any time soon. Yay for clutter removal!! :D

I used a 1.75mm hook (so tiny!) and crocheted some triangles up. Because the thread was already measured out to be 20m, the triangles all turned out to be exactly the same size, and were easy to then crochet together and stuff. I'll be writing up a free pattern very soon :) (I have so many patterns to write out just now, I'd better get to it, eh?!)

Pyramid Pincushion
Pyramid Pincushion
Pyramid Pincushion
Pyramid Pincushion
Pyramid Pincushion

I like this pyramid in these primary colours. It's lovely and bright and cheerful, and it means my pins aren't just dumped on the chair next to me any more!! Yay!! :D

Thursday 10 March 2011

Sewing Cushions

There's not been much knitting or crocheting going on round here lately :( And it's all because of spring being on the horizon. (I say "on the horizon" because we actually had heavy frost/snow here yesterday, and now we have gale force winds, sigh)

My partner/bf/other half (why is it so hard to decide what to call him if you're not married?!) has got a serious case of spring fever and is going mad spring cleaning the house. I know, it could be far worse, and he could be a man who expects me to do it all, but it's kind of annoying watching this whirlwind going through the house trying to tidy when I'm so naturally messy, and don't get the whole spring cleaning thing. Anyway, last year I'd decided to sew some cushions using the stuffing from old pillows, but only got as far as pinning bits of material into squares, then shoving them into a bag. And recently the questions started... "When are you going to finish those cushions you started?" etc. So I decided to start finishing them.

I've made three cushion inserts so far.


Each cushion insert has the full stuffing from a pillow, so they're very soft and squishy :D

They're all hand-sewn, so it's taking forever to make the inserts, and I haven't even started thinking about the covers yet.

I used some material that I had lying around, that I had received from a friend of my bf's mother. It was about 12" wide, and yards long. I wanted 18" cushions, so I sewed two strips of it together side by side to make the 18" (you can sort of see the construction in this photo. I didn't cut the material apart from lengthwise, so I sewed two seams over the overlapping bits.)


Sorry about the blurriness, it's very hard to take a picture indoors of black thread on black fabric, when the weather sucks so bad :(

Anyway, then I tacked all the way round the edge, leaving just a bit at the corner for turning inside out and stuffing, which I then did. Then I sewed round the edge again, using an invisible seam that I learned at a sewing class one time. So it's taking ages, but it's definitely not going to fall apart!

I have enough black material for 5 cushion inserts altogether, but I have another 5 old pillows to use for stuffing, so I'll need to make another 3 inserts after the black ones, I think. At least. But, at least I'll have some lovely new cushions instead of squished old pillows.

I had been a bit worried at the start of all this if the inside of the pillows would be all grotty and dirty, because they had been used as pillows by us. But they seem fine, and the cushions are going to be used by us too. I would feel a bit differently about using someone else's pillows I think, but when I took the pillows apart, the stuffing looked clean, and the only problem was that it was all squished down. Now it's torn up and put in the cushions, it's all fluffy again :D

Unfortunately, this means that I haven't had much time for knitting or crochet. I've done a bit of spinning though, and I'm trying to fit in my other crafts around cushion making. I'm trying to convince myself of how lovely it'll be when I have all these cushions, and no old pillows or this fabric lying around, but I may have to cast something new on soon to break the monotony! :D