Showing posts with label modification. Show all posts

Friday, 30 September 2011

It's been a while...

but I'm back :D

I disappeared from knitting for a while. My mojo just up and disappeared all of a sudden :( I actually hardly knit anything for a while, and even stopped listening to knitting podcast. I even, gasp, didn't go on ravelry.

I'm blaming it on two things. First of all, I was quite ill over the summer there. I was having problems breathing, and couldn't sleep at night without waking up out of breath, then I got a cold/flu which turned into tonsilitis. It really sucked. On the bright side, out of it all, I *finally* got diagnosed with asthma, after having these symptoms for the past few years. It's aggravated by hayfever for me, so in the summer it gets worse. Which explains the chest problems I've had for the past 3 summers :/ But I have inhalers and anti-histamines galore now, and it's great. I can actually sleep all night through! You wouldn't believe what a difference that has made. Sleep seems like such an basic thing, but when you're waking up every 3 hours and your sleep is interrupted to such a degree, it's hard to focus on anything through the day, and my energy levels were going right down. But now, I feel good. I have energy - even my metabolism seems a bit speeded up and my weight is easier to control over the past month or so of having these meds.

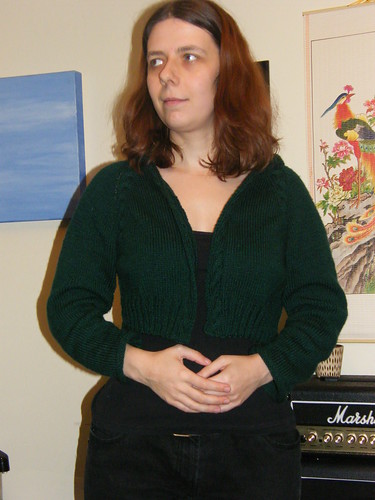
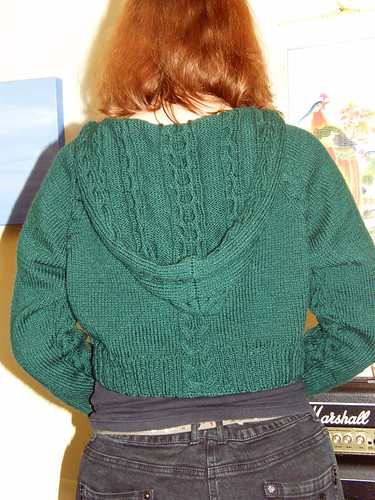
I'm also blaming my lack of motivation on deadline knitting. I went to my cousin's wedding last month, and had to knit a shrug for it. I also had a couple of other things that had to be knit quickly, and my appetite for knitting just disappeared because of it. :( The shrug turned out nice though - here's me in my "going to a wedding" outfit:


You can't see it that well because it's black, but it's another Two Tone Ribbed Shrug (pattern by Stephanie Japel from the book Fitted Knits). I made it from Debbie Bliss Rialto DK on 4mm needles. It's the third time I've knit that shrug. It's a very flattering shrug and I love it, but having to knit it quickly just put me right off :(

I'm getting my mojo back - I've been listening to podcasts again and have been queueing patterns on ravelry, and even been knitting too!

Deep In The Forest Mittens

Deep In The Forest Mittens

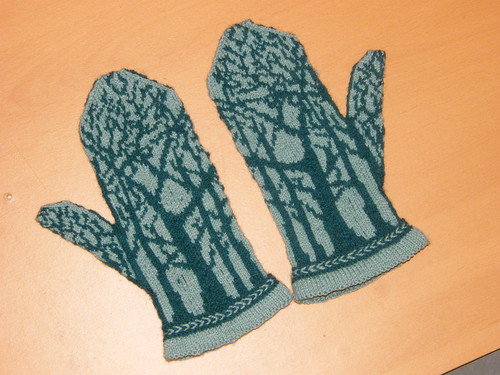
These are the Deep In The Forest Mittens by Tuulia Salmela. I've wanted to knit these for ages! I spun the yarn myself - merino, to just over a fingering weight, and then knit them this month as part of the Harry Potter Knit And Crochet House Cup over on ravelry. It was good motivation, and I'm really enjoying colourwork just now! I've even spun up the yarn for my next pair of colourwork handspun mittens already!

I modified the pattern so that the picture would be the same on both hands on the front and back. I did this just by working the chart from left to right on the right mitten, and placing the thumb on the other side of the front. I also reversed the braided edging on the right mitten so that the arrows on them would both face “inwards”, by reversing the two rows on which the braiding is worked.

I'm so pleased with these mittens! I love making colourwork out of my handspun! I'm still a bit put off knitting anything else at the moment, like hats or pullovers or anything like that, but I'm really enjoying the process of spinning and knitting mittens, so I'll just go with that for the time being :) I hope to get even more back into it soon :D

Sunday, 29 May 2011

More Ripping Back

More progress, then ripping of the Cedar Leaf Shawlette. I managed, with the help of markers, to finish the main body of the shawl. This time, I placed a marker just after each wrap when I worked it, then I wouldn't go past it, and rework it. This worked, and it was much easier to just knit, without having to look down at my work every few minutes to see if I was at the next wrap yet.

I started the leaves around the border, and actually did 13 out of 30. But something was niggling at me. The pattern has you join the stitch of the border to the body, then knit it again on the next row. But it was looking kind of untidy. I checked the picture in the pattern, and mine did look the same as the detail picture, so I was obviously doing it right, but it didn't look right. I tried ignoring it, but with each leaf it bothered me more, and I eventually figured I wouldn't be happy if I just left it.

So I did an experiment, and decided to slip the first stitch on the RS rows for one leaf to see how it looked.


Forgive the crappy picture, it was half past two in the morning, only electric light, and photoshop can only brighten it so much. The colour is actually a rich dark green, less gray than in the photo.

But you can see how on the last leaf, it looks much tidier where the leaf joins the body. That row of knit stitches lies much straighter, and doesn't wibble about so much. The stitches are less squashed together too, and just lie much nicer against the body.

So I ripped out all of my leaves and started again. This time I wasn't so bothered by ripping out though, because it was a choice that I'd made, and not a huge mistake. And those leaves are really fun to knit!

I'll be much happier with the shawlette now. I've knit three of the leaves already, and it's looking much, much nicer. I don't finish every leaf and think how wonky it's looking, which is very nice :)

Saturday, 23 April 2011

Mitten Knittin' (and a rant about thumbs)

I haven't been knitting much recently. I've got a serious case of spring-clean-fever and have been going nuts washing windows, cleaning skirtings - if you knew me in real life, you'd be so shocked! So, it's good that the house is getting somewhere near clean, but it means less time for crafting :(

What I've been knitting are mostly mittens. I'm about to start some Galileo mittens with my handspun - black and orange, should turn out pretty funky! :D What I have been knitting is the #03 Green Autumn (Druid Mittens)by Jared Flood, from Vogue Knitting, Fall 2008. I'm using yarn that I bought from the Yarn Yard at knit camp last year - I don't know what particular yarn it is other than it's fingering/sock weight merino/nylon and is brown :)

First off, I have a rant about mittens and gloves with thumbs on the palm. My thumb is not coming out of my palm. My thumb sticks out at the side, just like most other humans'. Why designers feel the need to put thumbs on the palm I have no idea. It just pulls the mitten all out of shape when you put them on. Sure, they look just beautiful in the photoshoot where they're lying on a table, but as soon as you put the them on, your mitten is twisted halfway round your hand and just looks kinda fugly in my experience. I don't want to give myself some RSI by holding my thumb round in front of my palm all day just to make my mittens look pretty.

So, I decided to change the thumb placement. Also, I like gussets. It's just shaped more like an actual thumb. So, I thought, I've done thumb gussets before. I know the general theory, I'll just stick one on the side of these mittens and be good to go.

Ha!

This pattern is one of those that inserts a thumb gusset onto the palm. You cast on half as many palm stitches as you actually need, and knit the thumb in the remaining stitches. So the thumb is on the palm, AND it'll be too tight because it doesn't have enough stitches. *facepalm*

I didn't realise this about the stitches until I'd knit the cuff, and frankly I couldn't be bothered ripping it all out and casting on the right amount of stitches, besides the cuff would be too big then. So I increased the palm stitches till I had the correct amount needed for the entire palm. Then I put in some stitches for the gusset and increased from there. These are the notes I wrote on my ravelry page for them about my mods. I think they're vague enough to satisfy any copywrong worries, but if you have the pattern, you'll be able to follow along, I hope.

On the increase round, I increased till after the 2nd sl1,p3,sl1, then increased the remaining stitches to the full amount needed for the palm. After that, I added two more stitches for the thumb. I worked the palm as on the chart (minus all those thumb stitches - again, palm thumbs grrr!), and increased a stitch on each side of the thumb on rounds 1,4,7,10,13,16,19,22,25 (as numbered on the chart) so I ended up with 20sts between the palm and back of hand. I knit these for one more round, then put them on hold to pick up later.

For the other hand. I placed the thumb stitches just after the second sl1,p3,sl1 on the inc round, then increased the palm stitches.

I just knit the thumb stitches, no patterning. Will see how it turns out when I pick them up as to whether I keep them plain or not.


So that's my mods and my rant. It's just that it was my first time substituting a thumb shaping, and I got more than a little miffed at it. Here's a pic of how the mittens are looking so far:

Druid Mittens

Despite all my whinging, they're actually looking rather nice :)

The colour is actually a little darker and browner that this. I love the cabling, and it was fun and interesting to knit once I'd worked out all my issues with the thumbs. I just need to pick up those thumb stitches and knit them now, but the call of the Galileo mittens is becoming too much... :D

Sunday, 22 November 2009

BPT Modification

From this:


To this:

Modified BPT

About a year ago now, I "finished" my BPT jacket (the pattern is from knitty.com and can be found here). I wore it for a while, but then stopped because there were some aspects of it that I didn't really like. I had used a yarn which was really too thin, so the fabric was quite drapey. I had elected not to do any waist shaping, so it kind of just hung there, looking all loose and floopy. And because I had used acrylic, the I cord edging rolled like nobody's business! (apparently I cord edging doesn't work on acrylic according to someone on ravelry. So it must be true ;) )

It sat in my cupboard for ages, and I contemplated just ripping it back totally, but never really got round to it (my laziness turned out to be a good thing actually). Then I got the idea, what if I made it shorter, into a cropped cardi? It's knit top down, so I could just pick out the bottom part and rip back up to the chest. Then all I would need to do is add some ribbing, and it would be fine. That would solve all the above problems. The drapey fabric wasn't really a problem at the top of the sweater, just at the waist where there was no shaping, so it hung loose. And ripping the bottom would get rid of that I cord. So I went ahead and did it!


I like it much better this way. Before I could rip out any of it, I had to take the zip off, and I still haven't gotten around to trimming it and putting it back on, but I actually kind of like it without the zip. I wore it when I went to Jewel of Yorkshire in October, and it was great for that time of year, keeping my top half warm, but because it's cropped I wasn't too hot.

I kept the cable on the back running down into the ribbing:

Modified BPT

I like the little detail it adds. :)

This is the first sweater I've modified so heavily, and I have a couple of others that I'm not so happy with that I might change in some way. This mod turned out really well, I think, so it's given me some confidence to change some of the other ones.